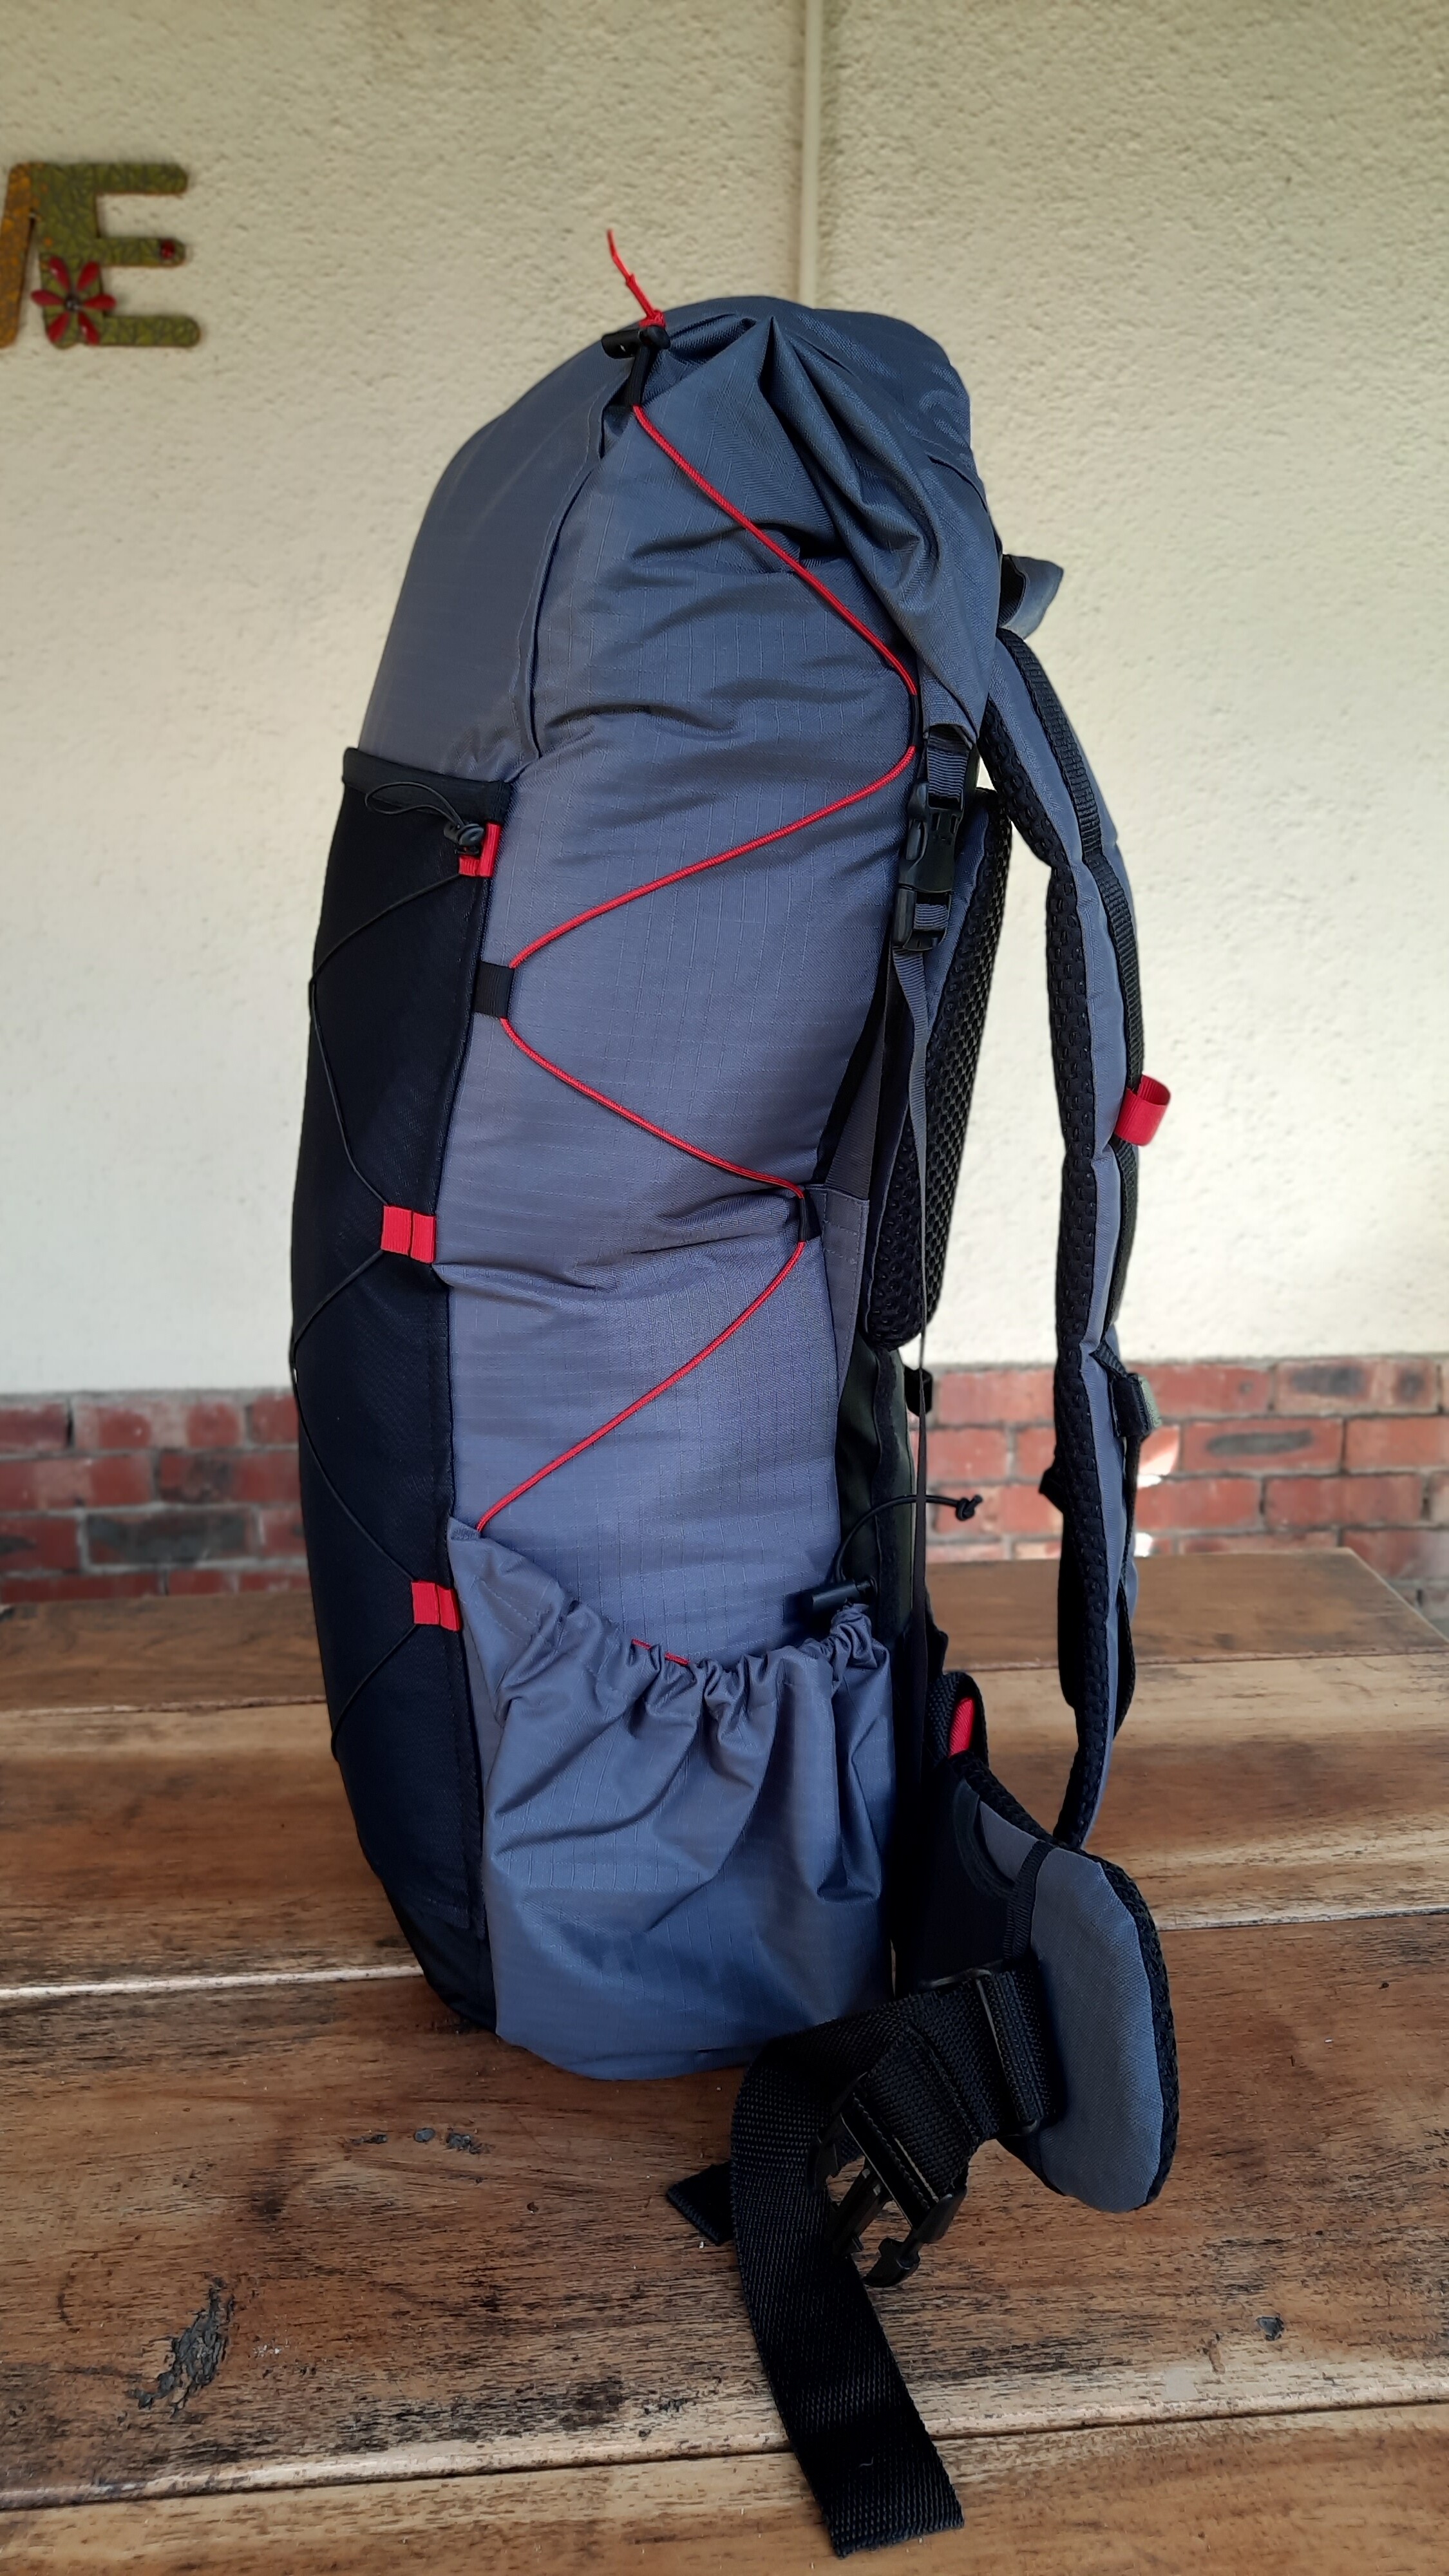
Thought I would share my experience with trying to lighten my base weight to the UL levels (<4.5 kg). After reducing everything else, I found that my pack (and tent, but that is another story) was by far the heaviest thing on my kit list. After trying unsuccessfully to find a UL pack in SA (and not wanting to import one for R3000+), I decided to try to make one myself. So, after many mistakes, finished it and can say that it is totally possible. We don’t have the material that they use in the US but found some 410D PU coated ripstop nylon in Cape Town and sowed my own. I have never sewn anything before, but it is easier than one thinks.
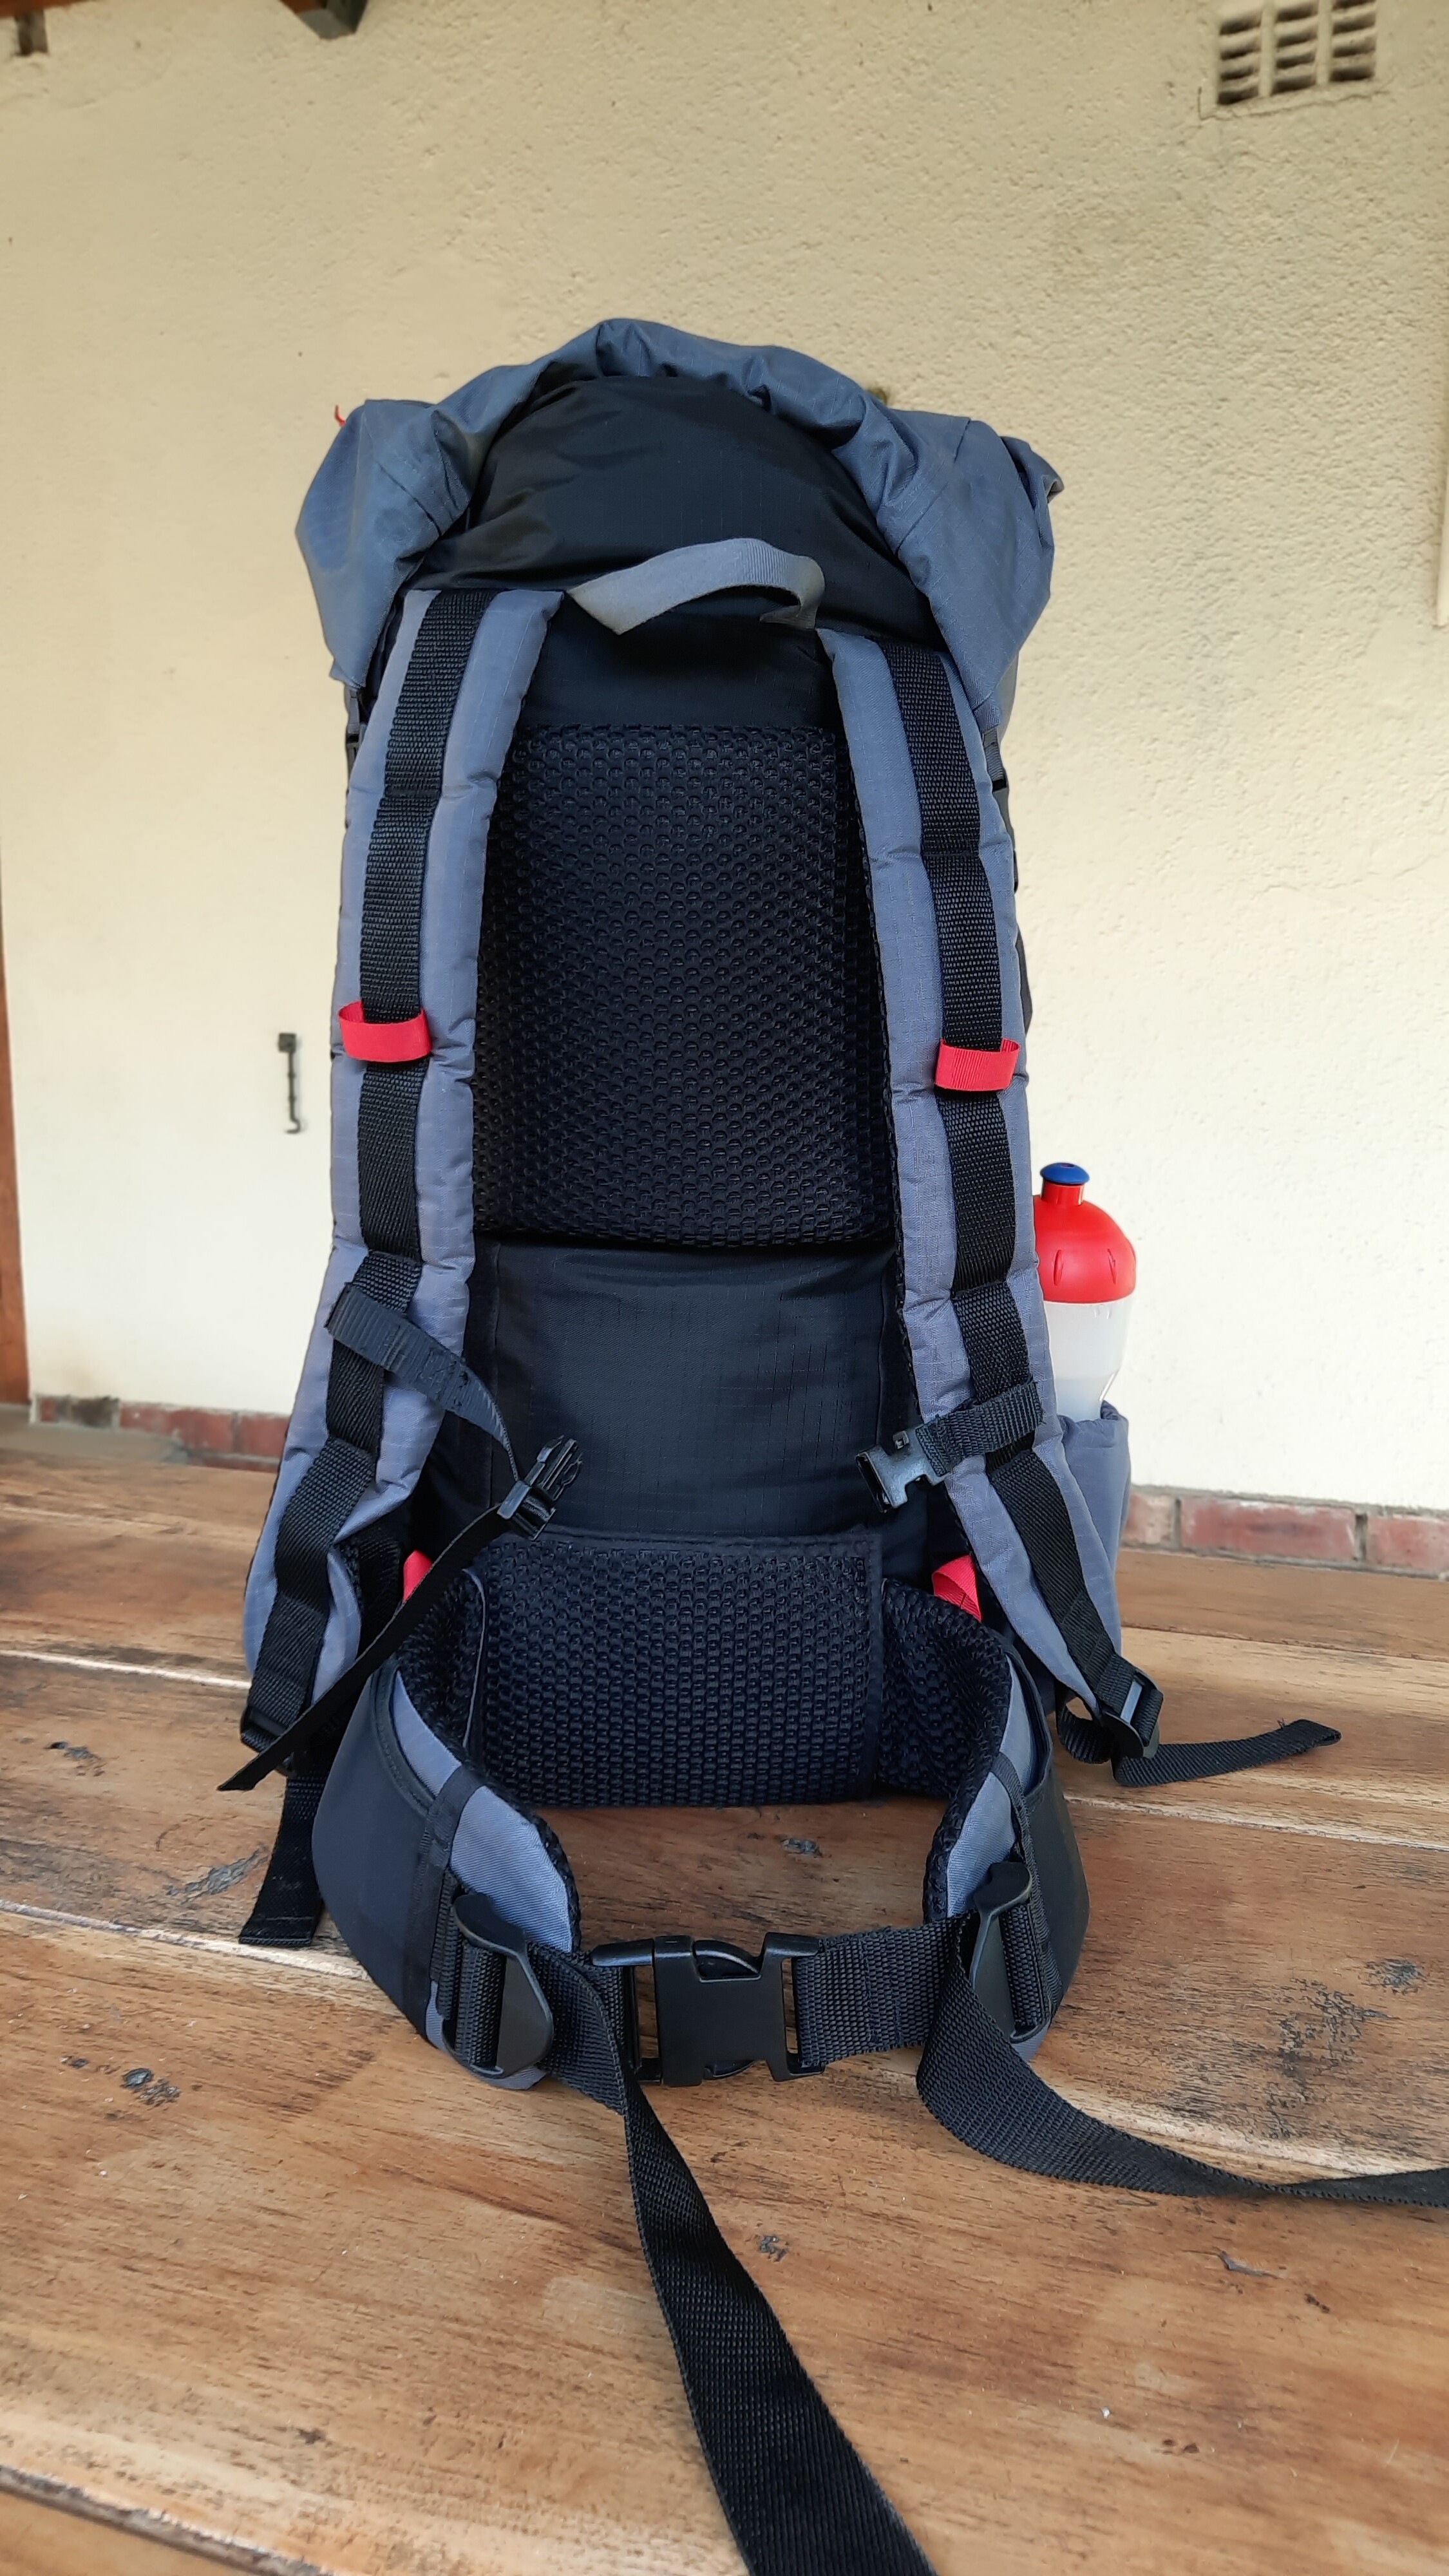
The pack weighs 715g with aluminium struts and hip belt. I am not sure about the size, but it fits all my gear for wilderness camping and food for 3 days (it’s probably a bit big actually). It’s the typical roll-top design with an external mesh back pouch and side pockets for water bottles. The materials cost a fraction of a new pack (about R350-R400 if you make more than one pack). I cannot tell you how great it is to do 3 days in the Cederberg with a total pack weighing less than 10kg.
We were so chuffed with it, that I have now made a second for my wife and am busy on the third.
Am basically posting this to let the community know how doable this is. I would be keen to engage with anyone else who has done this to hear what they learnt or to offer advice or assistance to those who want to give it a go (so that you don’t make the same mistakes I made). I would highly recommend giving it a go, it is one of the most rewarding DIY projects I have done.
Let me know on this thread if you want to discuss it in more detail and we can make a plan to chat.
Hey Chris, that’s really impressive! I’ve definitely seen small companies making and selling UL packs that looked far worse in terms of both design and finish.
715g also seems like a really good weight with the framestays, guessing based on strap and pocket dimensions but that looks in the 30-40L range. If you wanted to workout volume, maybe try a black bag in it, fill with water then decant into a measuring jug?
Really liking the minimalist hipbelt pockets, the rolltop cinch angle is great as well. Doubling up the front bungie tighteners as trekking pole/ice axe holders is a nifty idea I haven’t seen elsewhere.
If you don’t mind me asking, where did you find ripstop nylon in CT? Been meaning to buy a sewing machine and give some projects a try, then every time I look for materials I come up blank.
A friend of mine did the same thing and also had great results. Definitely doable. Yours looks great!
For day hikes, I actually use kids 20 litre backpacks. With a sub 5kg pack, you don’t need hip straps or anything, and compartments are just extra weight that also reduces what you can fit in it. I tighten the shoulder straps so the pack sits high on my back and doesn’t move around too much. I have bought 20 litre hiking packs before - they are definitely inferior to a super cheap kids pack. A 600g 20 litre Cape Storm pack vs a 200g kids pack is an easy weight saving, as well as being a fraction of the price.
The real problem is that gear companies want to list features, so they add useless stuff that no one ever uses. My go-to light multi-day packs are a 26 litre Mountain Hardwear pack (which I have used in the Drakensberg and the Cape for hikes up to 4 days) and my 33 litre Osprey Talon (which I have used for 3 different Drakensberg Grand Traverses, and many other multi-day hikes). They weigh 600g and 800g respectively.
I recently did a 3 day solo hike in the Hex where I used a 33 litre Osprey pack, and even with my 2.5kg tent and -7C sleeping bag, I was still sub 8kg. The trick with ultra-light is to just not take anything. I’ve completed 3 different Drakensberg Grand Traverses without tents and using a 33 litre pack.
I used to use a K-Way one, which cost R200 or so. Sadly that pack broke (after about 1000km of hiking, so I more than got my value out of it) and it was discontinued before I could buy a new one. My current one is a Soviet bag I got on a closing down sale.
Thanks for the volume measurement tip, brilliant idea. I will give it a go.
I got the ripstop at a place called Bloch and Levitan in Paarden Eiland. The grey is about 170g/m2. They have 4 colours (grey, black, dark green and dark blue). They are wholesalers but do sell the 1.5m wide rolls by the meter.
When looking for a sewing machine, it seems that the fancy Elna type sewing machines can get expensive and you don’t need all those fancy stitches. I have seen some simple industrial machines on Gumtree for about R3000 to R5000 which I would think are more than good enough, but maybe others can offer advice on how easy those are to use.
Thanks for the link. They look like the company I have been trying to find. Next project may be a tent or sleeping bag, but I haven’t been able to find the right materials. It looks like they will have what I am looking for.
I got a template for the side pockets from Loose Goose Down Supply in the US, he was very happy to email it. He has a youtube channel with instructions and you will find his email address there. The rest I sketched up myself. There are a few templates available on the net, but none of them really worked for me. So I adapted them to suit what I wanted so as to incorporate the design elements I wanted from various packs I’ve seen on the net.
Nice trip and agree fully on the useless features that they use to sell packs. Osprey Talon is a lekker pack. You’ve really done well to be sub 8kg with that kit. Well done!
Wow! I can’t imagine having such a light pack! That’s amazing for a multi day hike!
So do you not take any other clothes with except the ones on your back?
Or do you not eat a lot?
hi Gaznivad
if you are doing a DGT without a tent, what do you use for shelter please?
no cooking or boiling water?
i’m really keen to find out
regards
Mike
We used caves each night. For a 5 or 6 day traverse, you can plan caves fairly easily. For a longer traverse you have to start taking harder lines to get to the caves. I have done it 3 times without tents, and my nights were as follows:
5 days, South to North:
Sehonghong Shelter (barely sleeps 1, unmarked)
Bannerman Cave
Didima Cave
Ledgers Cave
6 days, South to North:
Tsepeng Cave (unmarked)
Upper Nhlangeni Cave (unmarked, the one on the map is further down the pass)
Upper Giants Cave (unmarked, the one on the map is further down the pass)
Reido Cave (unmarked)
Upper Nguza Cave (unmarked)
6 days, North to South:
Easter Cave (big day)
Upper Injisuthi Cave (probably the hardest day of hiking I’ve ever done)
Upper Giants Cave (we all crashed, so we called it a day very early)
Sani Top (we got caught in a massive storm and had to give up on the concept of an unsupported traverse)
Sani Top again (it rained all day - we finished from there the next day)
You don’t really need to boil Drakensberg water, so that isn’t an issue. For cooking - I just used foods that you don’t have to cook, like biltong and tuna. Incidentally after having tuna most nights for 2 DGTs of 6 days over the space of 16 days - I haven’t really eaten tuna again since then.
Full story of the two 6 day traverses here.
Disclaimer: I have spent over 400 days of my life in the Drakensberg. I know the range very well. If you don’t know the caves very well, including backup ones, please don’t go hiking without a tent. I have personally spent a number of Drakensberg nights out in the open when things haven’t gone according to plan - so please also make sure you know how to bivy properly.
Wow, nice pack, Chris! What did you use for the padding on the shoulder straps and the hipbelt, and what material is covering them? It looks very professional!
Hi. Sorry for the late reply, been away from my desk. If you are talking about the spacer mesh in the inside of straps, I found it in a fabrics shop in Maitland. I think they referred to it as automatic fabric. It’s pretty hard to find in South Africa it seems. The outside of the straps and hip belt is the same ripstop nylon as the rest of the back.
Cheers
Sorry for the extremely late reply, was away for quite a while. I just used 2mm x 19mm aluminium flat plate. I get it from Aluminium Alloys here in Cape Town, but am sure you will be able to find some at a Builders Warehouse or an aluminium supply specialist.
I’ve had some interest in people buying one, but haven’t really worked out pricing yet. Am still in a bit of an R&D/ product testing phase. If you are prepared to take a beta version for product testing I can give it to you at cost. I’ve sent you a DM.
If there are any others out there who would like to do some product testing on the beta version, you are welcome to DM me.